This video was just testing how we could use external camera sound using a microphone placed slightly out of shot, the quality of sound is much greater and i would like to use a microphone during my preliminary task.
|
In this video i represent the different shot types and movements that i can use in my preliminary task. Shot types used are: Extreme close up, close up, medium shot, long shot, extreme long shot, birds eye view, worms eye view, point of view, high angle, low angle and dutch angle. Movements used are: Tracking, dolly, crabbing, panning, tilting and crane. Some of the shots are inaccurate because i did not have the correct equipment such as a crane and tracks. 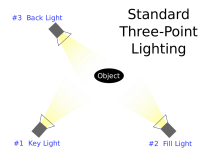 Three point lighting is the standard method used in media to illuminate a subject in a desired way, while also controlling the shading and shadows by using three separate lighting positions. The key light: This is the main light used on the subject. The fill light: The purpose of this light is to fill in the shadows created by the key light, preventing them from getting too dark. The back light: This is used to separate the subject from the background. 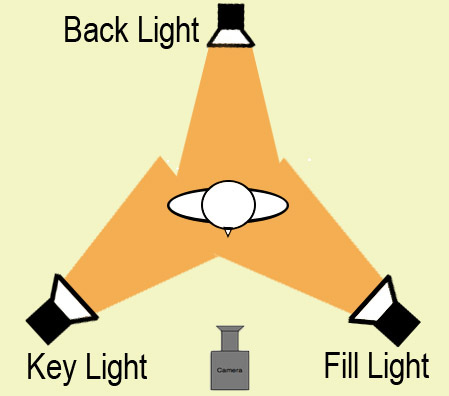 To help me understand the concept of continuity for my preliminary task, I have been told to research 3 of the main rules of continuity editing that i will need to use in my preliminary task; 180 Degree Rule, Shot Reverse Shot and Match on Action. The 180 degree rule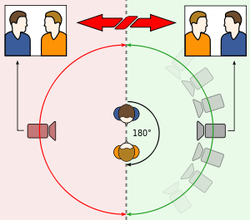 The 180 degree rule is a guideline used in film regarding the relationship between two characters and the space around them, that enables the scene to be continuous and flow without interruption which allows the viewer to be able to follow the scene easily and make them engrossed in the scene. There is an imaginary line between the two characters called the line of action or the axis. Whilst filming, the camera must always stay on one side of the line within the allocated 180 degrees. If this rule is broken, it makes the scene look unrealistic and also very unprofessional, and it will seem as though the characters are no longer looking at each other when talking to each other, therefore causing the viewer to lose focus during this scene.  Shot reverse shot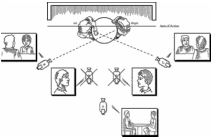 Shot reverse shot is mostly used when editing dialogue scenes. It uses a shot, usually from behind the shoulder of one of the characters, looking at the other character so that you can see both characters in the picture, but the character you are looking at is in focus and the shoulder of the other character is out of focus. Shot reverse shot is often used to portray emotion and exaggerate facial expression. 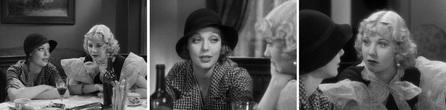  Match on actionMatch on action is an editing technique where one shot cuts to another shot but they both portray the same action. The view of the action changes, but the action does not, it is not supposed be detected by the viewer and contributes to the continuity of the scene. This will make the scene flow and keep the scene smooth.  My name is Jack Cleevely and I am an AS Media Studies Student. Welcome to my blog where I will be posting all my work over the period of the year.  |
Author
16 year old Media Studies student interested in music, film, marketing and sports.Archives
May 2016
Categories |
 RSS Feed
